
Adobe ExtendScript Toolkit, as the name suggests is an Adobe Toolkit that you could use to automate your workflow with Adobe products like Photoshop and Illustrator. No matter how small a task is, if it’s repetitive, it get’s irritating really quickly. Small, simple tasks like grouping your artwork before exporting, exporting to multiple formats, checking if outlines exist before exporting etc can get irritating if you need to do them on multiple files too often. Adobe ExtendScript Toolkit is a solution for such situations. It basically let’s you automate these tasks so all of it would be done at the click of a button. While Adobe ExtendScript Toolkit is an internal feature, it can perform a few tasks even outside of Illustrator. For e.g. creating new folders, renaming folders based on the contents etc. Adobe ExtendScript Toolkit uses JavaScript, AppleScript and VBScript.
When should Adobe ExtendScript Toolkit be used
For the sake of this post, let’s take an example of Adobe Illustrator. This is a real world example that I faced and fixed using Adobe ExtendScript Toolkit. I often had to make artworks as AI files, and then when finalized, export them to PNGs. However, the PNGs had to be exported to multiple resolutions. The PNG files also had to be stored in separate folders according to the resolutions.
So for example, if I had a file named “Flower.AI” in a folder named “AI Files”, I would need to export / save it in a folder named “PNG” with sub-folders in the following way:
- PNG (64px by 64px) in a folder named “64×64”.
- PNG (128px by 128px) in a folder named “128×128”.
- PNG (512px by 512px) in a folder named “512×512”
- PNG (1024 by 1024) in a folder named “1024×1024”
At first this didn’t feel like a big deal. Basically, all I had to do was:
- Click on Export
- Set the resolution
- Click save/export
- Choose/Create the desired folder
- Click save
There! Just 5 simple steps that would not even take more than 30 seconds. However, when I actually started working on my artworks, I quickly realized how irritating this could be. The default folder would often change, which meant I had to re-navigate to the desired folder. It would also get irritating to repeatedly set the resolutions every time I exported a new file. I would often have to create new folders with the same names. Basically, it all got very repetitive and mechanical.
Given the repetitive nature of these tasks, I felt a strong need to automate them. This is where I stumbled upon Adobe ExtendScript Toolkit.
Adobe ExtendScript Toolkit are useful, when:
- Tasks are highly repetitive
- Tasks do not need high brain processing (predefined file settings, file names, folder structures etc)
- Tasks are performed very frequently
As the tasks I mentioned in the above example match these criteria, it made sense to go ahead and automate them.
So without further ado, let’s jump right into making our first Adobe Script.
Making your first Illustrator Script
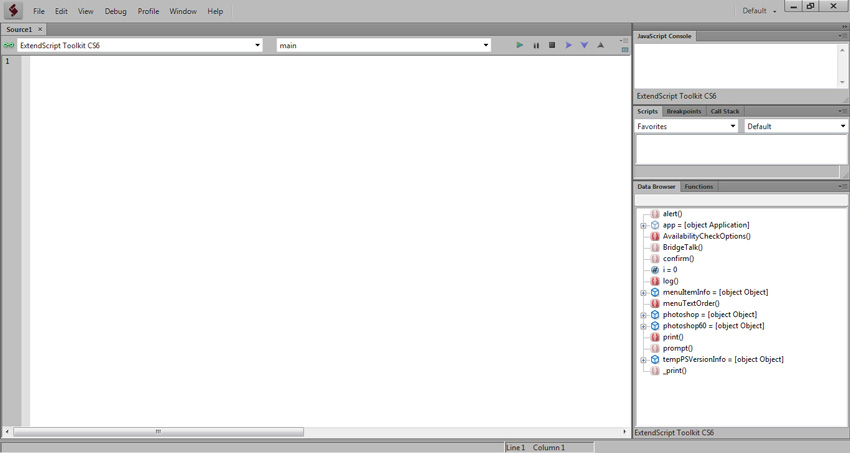
The programming process of every Adobe Script starts with the “Adobe ExtendScript Toolkit”. This is the case not only for illustrator, but for all Adobe Products. You should find it directly in the start menu. Also ensure you have your target Adobe Application running in the background as well. In this case it would be Adobe Illustrator. Once launched, you should have something like the following screen:
Next, you choose the relevant adobe application that you would like to automate in the drop-down to the top left corner. Doing this would load all the necessary data objects in the data browser to the right. This is a handy tool when you’re trying to manipulate an object but are unsure what exactly it’s name or methods would be. We’ll get to using it while programming a little further in this tutorial. For now let’s dive directly into the code.
You can code in three languages using Adobe ExtendScript:
- AppleScript
- VBScript
- JavaScript
For this example we will look into JavaScript. JavaScript has been traditionally used for making websites. It helps make webpages smarter and more interactive. Functionality like form verification, displaying contextual data, detecting user key presses etc are commonly established using JavaScript. However, over time JavaScript has started to gain popularity in a variety of areas like server side scripting, native application development and off-course Adobe Automation.
Here’s the script I used to automate the above tasks. (Exporting PNGs in multiple sizes in multiple folders).
|
1 2 3 4 5 6 7 8 9 10 11 12 13 14 15 16 17 18 19 20 21 22 23 24 25 26 27 28 29 30 31 32 33 34 35 36 37 38 39 40 41 42 43 44 45 46 47 48 49 50 |
saveAllSizes(); //call the function //handle sizes function saveAllSizes() { if ( app.activeDocument ) { var size = ['64', '128', '512', '2014']; for (var i = 0, len = size.length; i < len; i++) { saveAsPNG(size[i]); } } } //main PNG exporting function function saveAsPNG(res) { var dest = createRelFolder('PNG', res); var scale = getScale(res); var exportOptions = new ExportOptionsPNG24(); var type = ExportType.PNG24; var fileSpec = new File(dest); exportOptions.artBoardClipping = true; exportOptions.antiAliasing = true; exportOptions.transparency = true; exportOptions.saveAsHTML = false; exportOptions.horizontalScale = scale; exportOptions.verticalScale = scale; app.activeDocument.exportFile( fileSpec, type, exportOptions ); } //Create and name target folder function createRelFolder(name, res) { parentFolder = app.activeDocument.path.parent.toString(); if(res) { var dest = parentFolder.concat('/'+name+'/'+res+'x'+res); } else { var dest = parentFolder.concat('/'+name); } var testFolder = Folder(dest); if(!testFolder.exist) { testFolder.create(); } return dest; } //Calculate scale values in percentage function getScale(res) { return (res/app.activeDocument.width) * 100; } |
As you can see, I’ve divided the code into four main functions, namely:
- saveAllSizes() : Handles the entire script’s execution and size management.
- saveAsPNG(res) : Core function that does the actual exporting to PNG files.
- createRelFolder(name, res) : Handles file management, creating.
- getScale(res) : Handles size values while exporting.
Along with this there’s also a call to the saveAllSizes() function in order to initialize the whole process.
Let’s now look at each section in a little more detail.
|
1 |
saveAllSizes(); //call the function |
This part of the code simply calls the function. If you didn’t add this line and coded everything perfectly it would still do nothing as no call was made to the function. This line simply initializes the script.
saveAllSizes()
|
1 2 3 4 5 6 7 8 9 |
//handle sizes function saveAllSizes() { if ( app.activeDocument ) { var size = ['64', '128', '512', '2014']; for (var i = 0, len = size.length; i < len; i++) { saveAsPNG(size[i]); } } } |
As stated earlier, this function handles the entire execution of the script. It basically keeps things together and runs the core exporting function (saveAsPNG(res)) in loops for each desired size. The desired sizes are stored in an array “size”. “saveAsPNG(res)” is then run in a loop of four iteration, once for each size. The code is designed such that the number of iterations in the loop is equal to the number of sizes defined in the array. Thus, if you added another size to the array, things would still run smoothly. There’s also a check at the start to see if a file is even open to be processed. This is done using the “app.activeDocument” object, which refers to the current document in the selected application. In this case, Illustrator.
saveAsPNG(res)
|
1 2 3 4 5 6 7 8 9 10 11 12 13 14 15 |
//main PNG exporting function function saveAsPNG(res) { var dest = createRelFolder('PNG', res); var scale = getScale(res); var exportOptions = new ExportOptionsPNG24(); var type = ExportType.PNG24; var fileSpec = new File(dest); exportOptions.artBoardClipping = true; exportOptions.antiAliasing = true; exportOptions.transparency = true; exportOptions.saveAsHTML = false; exportOptions.horizontalScale = scale; exportOptions.verticalScale = scale; app.activeDocument.exportFile( fileSpec, type, exportOptions ); } |
This is the simplest function of all as things are very straight forward. This function runs four times in the current scenario, once for each desired size. Let’s understand the variables and exportOptions object a little better.
Variables
dest : This variable holds the address of the target folder where the exported file has to be saved. In this case it would be “64×64”, “128×128” so on and so forth. These folders are created by the “createRelFolder(name,res)” function, and the folder’s address is then passed on to the variable here.
scale : For some reason, Adobe Illustrator does not allow specifying the resolution in pixels. Instead, it let’s the users specify a % width and a % height. The exported PNGs would then be sized according to the specified percentages as compared to the original artwork. So for example, if I had a artwork that was 100px by 100px and I exported it at 200% width and height, I would have a PNG that was 200px by 200px. As the artwork can be of variable sizes, I had to write a function “getScale(res)” that would calculated the correct percentage and set that as the value for scale.
type : As the name suggests, type specifies the type of file being exported. In this case a PNG24 file.
fileSpec : Here, we create a new file object at the desired location, i.e. in the recently created target folder. This object is then stored in the valiable
exportOptions : exportOptions is an “ExportOptionsPNG24” object. This object stores all the configuration and settings to be set while exporting to PNG24. It is here that the scale, transparency, antiAliasing, artBoardClipping etc would be set. As the values show, most are boolean, i.e. either true or false. Basically enabled or disabled.
app.activeDocument : “app” refers to the current app, in this case illustrator while “activeDocument” refers to the currently open and selected file. “exportFile” is a method within this “app.activeDocument” object that actually initializes the export command. It also takes three parameters i.e. the new file path, the export type and the export options. All of which have been set in this function.
Things should already be quite clear by now as we have already got a sneak peak into what “createRelFolder(name, res)” and “getScale(res)” does. However, let’s still dig a little deeper into how exactly they achieve their tasks.
createRelFolder(name, res)
|
1 2 3 4 5 6 7 8 9 10 11 12 13 14 15 16 17 |
//Create and name target folder function createRelFolder(name, res) { parentFolder = app.activeDocument.path.parent.toString(); if(res) { var dest = parentFolder.concat('/'+name+'/'+res+'x'+res); } else { var dest = parentFolder.concat('/'+name); } var testFolder = Folder(dest); if(!testFolder.exist) { testFolder.create(); } return dest; } |
As stated earlier, this function creates and names the target folder based on the type of export and the export size. I have kept the “type” as a variable to make things easier when I need to automate exporting to more file types in the future.
Before we proceed, let’s understand the context a little more. In this scenario, I had a folder let’s say – Business. Within this folder I would have a folder named “AI” that would hold all my AI files. The goal was to create a folder named “PNG” alongside “AI”. Inside of this “PNG” folder, I would have four more folders i.e. “64×64”, “128×128”, “512×512”, “1024×1024”.
Something like this:
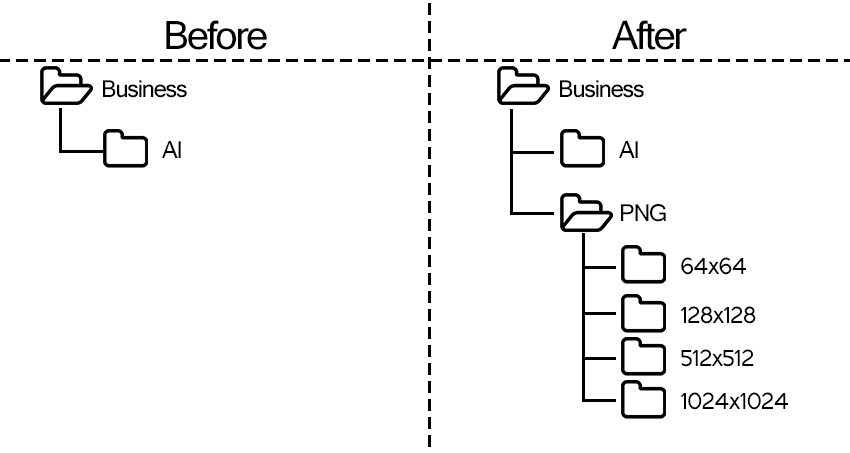
Hence, in order to create a new folder next to the current “AI” folder, we would need to get the address of the current parent folder i.e. “Business” in this case.
|
1 |
parentFolder = app.activeDocument.path.parent.toString(); |
This line of code takes a current path of the active document (which would be the AI folder) and then accessess the parent of this object (“AI” folder’s parent i.e business). It then applies a method of converting the address to a string that would be stored in the variable “parentFolder”.
The next line “if(res)” checks if the a resolution is provided. This check can be ignored, I have added it with the future aspects in mind. Further, I would be using this code to export not only to PNG but also other formats like PDF and SVG. In those cases, I might not need to set a pre defined resolution as they would be vectors. This entire “If…else” statement is added just for this reason. It basically checks if the resolution is specified or not. If not, it just makes a folder with the file name (PNG, PDF, SVG) etc and if specified, it creates a folder with the file name and another folder inside with the specified resolution name.
|
1 |
var dest = parentFolder.concat('/'+name+'/'+res+'x'+res); |
Here, a string with the new folder path is created. “name” is the name of the file type, in this case PNG. while “res” is the resolution. like 64, 128, 512 or 1024 in this case. After all the concatenation done with the basic concat method, the string should be something like “Business/PNG/64×64/”. This would then be stored in the dest variable. Also do notice, how we can also use basic JavaScript functions like concat directly.
This string is then converted into a folder object by the below code.
|
1 |
var testFolder = Folder(dest); |
We then check if the folder exists using the folder object’s “exist” method. If it does not exist, we go ahead and create it as shown in the below code.
|
1 2 3 4 |
if(!testFolder.exist) { testFolder.create(); } return dest; |
We then return the path, so the “saveAsPNG(res)” function can proceed with this value.
getScale(res)
|
1 2 3 4 |
//Calculate scale values in percentage function getScale(res) { return (res/app.activeDocument.width) * 100; } |
This function basically calculates the percent equivalent of the desired resolution. As mentioned earlier, for some reason, Illustrator does not allow mentioning resolution directly in pixels. Instead, users are expected to mention a percentage value to which the exported file would be scaled. This means if I have an artwork that is 100px by 100px, and I need a 64px by 64px PNG, I would have to set the scale to 64%. However, what if the artwork was 150px by 150px (or any other value of that matter). We would then need to calculate what percent of 150 do I need to set so I get a PNG for 64px. Basically, what percent of 150 equals 64.
As the size of the artwork is variable, I had to make a function that would make this calculation for me. This is all that this function does. It takes the desired resolution (res) and divides it with the artwork’s resolution (app.activeDocument.width) and then multiply this by 100. The result would be the required percentage to achieve the required resolution, in this case 64.
That’s pretty much it. Once done save it as a “jsx” file. You can run this file by :
- Going to “File>Scripts>Other Scripts” and then choosing the desired file
- Pressing “CTRL + F12” which would open a file browser window. Select and run the desired file.
- Install the file so you can directly access it under “File>Scripts”. To do this move it to your “Illustrator installation folder (in Program Files)\Presets\en_IL\Scripts\”.
Feel free to use this code the way you would like to, make alterations, add more formats, more sizes, more export settings and file structures. For further reference you can refer to Adobe Scripting Center, they have a lot of resources conveniently organised based on the different Adobe Products available for scripting.
Feel free to share in the comments any techniques you found handy to automate your workflow.