In the previous post – Web Design Intro, we had a look at different components of the internet and web applications. In this post we’ll dig deeper into HTML (Hypertext Markup Language). I recommend people first learn HTML as it forms the basis of everything that follows.
So what is HTML
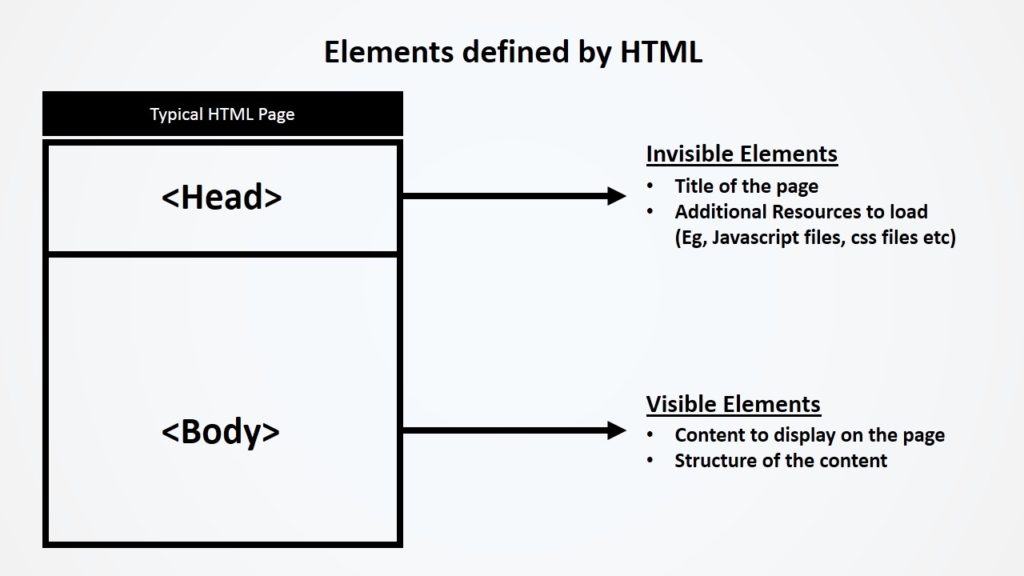
HTML, also known as hypertext markup language is the language used to define the content and structure of a webpage. Basically it defines what text, images, tables etc should go on the page. It also describes the sequence or hierarchy of this content.
In simple words, when you know that your content is going to have a heading, followed by a sub heading, followed by a paragraph with an image, you would define this using HTML.
Additionally HTML is also used to define aspects that don’t appear on the page like the title of the page, the icon for each page (the icon that shows up on the tab) etc. It may also be used to define what JavaScript, css files etc should be used on this page (more on this in a later section).
So broadly HTML is used to define
- Elements that appear on the page (heading, paragraphs, tables, images etc)
- Elements “off the page” (title of the page, what JavaScript, css files to use on this page etc)
What HTML is not
HTML does not take care of look and feel, behavior, interactivity etc of the page. So it might decide the contents of a heading, but not the font size, color and behaviour of that text.
Making an HTML Page
Making a HTML Page is very simple. You can use any text editor (even “notepad” that ships with every version of windows). I would however recommend using notepad++. It’s brilliant and I use it not only for coding but also for organizing rough notes.
To make a HTML page
- Go to the location you want to create the file at
- Right click > new > text document
- Change the file extension to “HTML” without the quotes.
- Alternatively you could open notepad (or any other text editor) and save the file as an HTML file wherever needed.
Really, It’s that simple.
The Syntax
Before I explain the HTML syntax, let’s take a moment and understand the term syntax itself. Syntax is just a term for structure. Computer languages need to be written in a certain structure so they can be interpreted by the system correctly. There are different elements with HTML like start tags, end tags, attributes etc, all of which need to be written in a defined pattern. So let’s take a closer look and these elements.
Here’s a highly simplified example of the code used to make a typical webpage using only HTML.
|
1 2 3 4 5 6 7 8 9 10 11 12 |
<html> <head> <title>Some title</title> <head> <body> <h1>Some header</h1> <p>Some Content</p> <img src="image.jpg" alt="image description" height="120" width="120"> </body> </html> |
HTML Tags
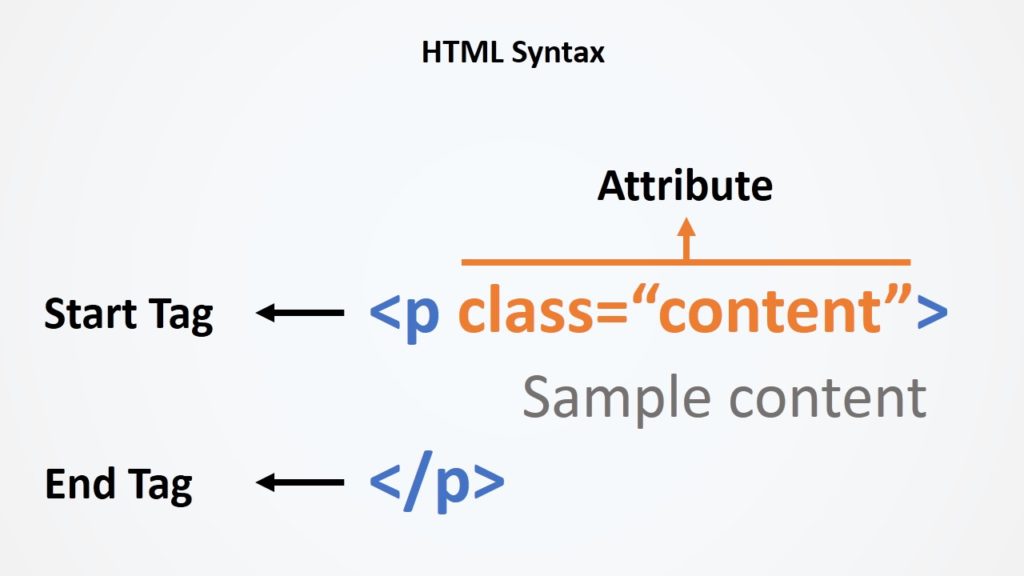
You may have already noticed certain words within angular brackets (< & >). <html>, <head>, <title> etc for example. These are known as HTML tags. Most HTML tags will be used in pairs of opening and closing tags. Tags like <html>, <head> and <title> for example are the opening tags while the </html>, </head> and </title> are the closing tags. However in some cases, like <img> there might not be a need for an opening or closing tag.
So what are these tags, and why do we need opening and closing tags separately.
Tags are used to define different elements. For example the <H1> tag is used to define main headings. While the <p> tag is used to define a paragraph. Any content between the opening and closing tags is considered part of the corresponding element.
For E.g.
|
1 2 3 |
<h1> Some header </h1> |
“Some Header” will be considered as the Heading of the content.
While in the case of
|
1 2 3 |
<p> Some Content </p> |
“Some Content” will be considered as contents of a paragraph.
Attributes
Attributes are basically additional information about a tag. For example:
|
1 2 3 |
<a href="www.url.com"> Click to go to URL.com </a> |
the “<a>” tag is used to define hyperlinks on a page. Like we observed first, the words “Click to go to URL.com” would be considered a link. Hence that text would appear as a link. However there is additional information needed in this case, like where should that link point to. This is done using the “href” attribute.
Attributes will always appear as a “key=value” pairs. The value being inside inverted quotes. Additionally an equal to sign (=) is needed to separate keys from values.
Attributes may or may not be mandatory depending on the concerned tag. For example as the <a> tag defines a link, and all links need to have a target, this attribute would be necessary. However in future posts you will see me use attributes that are not mandatory.
Self Closing Tags
In certain cases, tags don’t need to be in pairs of opening and closing tags. One single tag is enough. This generally happens when the element does not have any pre-defined content, or when the content is mentioned in an attribute.
Here’s are a few examples of such tags
|
1 2 3 |
<img src="image.jpg"> <br> <input type="text" name="fname"> |
In the above cases as you can see, the content is
- Mentioned in the attribute (<img src=””>)
- Empty (<br> basically means a new line, equivalent to pressing “enter” when typing and hence doesn’t need content to be mentioned”)
- Not pre-defined (the <input> tag creates a text box for users to enter data, however the data itself is yet to be filled by the user).
Nested Elements
As we just saw, content between the opening and closing tag is considered part of that element. But what if we were to mention other tags between the opening and closing tag? We’d have Tagception!!! Basically HTML elements inside of other HTML elements. In certain cases it’s important to include elements inside of elements.
Some good examples can be
- Image inside a link
You may have often come across instances where an image was also acting as a link. That is because the image element is inside a link (Known as an anchor) element.Here’s what the code would look like
123<a href="http://www.google.com"><img alt="Google" src="image.jpg"></a>
If you look closely you’ll see that the code for the image tag is inside the <a> (Anchor) tag. Hence the image itself is now also a link - Link inside a paragraph text element
Similarly we can place a link inside of a text (Known as paragraph <p>) element .The code for this would be something like this
1234<p>Here's an example of text with a<a href='https://projectilepixels.com/'>clickable link</a>inside of it</p>
This would generate something like this” Here’s an example of text with a clickable link inside of it. “
We can have an infinite level of nesting. Infact in future tutorials you’ll see a lost of instances where we have elements nested in levels 5-9 deep.
Additional Resources
As stated in the tutorial intro, I’ll also be sharing all material I found useful while learning. Here’s some of the resources I used while learning HTML.
W3Schools is probably the most popular and credible source for front end development. Feel free to look around and try code on their Tryit Editor.
Additionally I’d highly recommend you join Stack Overflow. It’s a beautiful community of very helpful developers.
Here’s a good list of HTML Tags along with related attributes for deeper understanding.
I also strongly recommend you have an open HTML file where you can constantly try out everything you learn in this series.
Now that you’re familiar with the building blocks of HTML we’ll put together a full fledged HTML page in the next post. I hope this post has demystified HTML at-least to a point where you’d be able to read and understand HTML code if you saw it.
Feel free to drop your questions in the comment section.