In the previous HTML tutorial we’ve learnt how HTML is used to define the basic structure of a webpage. We’ve also made a basic HTML page with a heading, image and a couple of paragraphs. In this post we’ll use CSS to enhance the look and feel of the webpage.
What is CSS
So what really is CSS? Well, CSS ( Cascading Style Sheets ) is a computer language specifically used to add style elements like color, fonts, line-spacing, position etc to webpages. In certain cases a little bit of interactivity can also be handled by CSS. For example the change in color of a link when your mouse hovers over it. However, this is a small aspect of CSS.
Making a CSS File
Just like HTML, CSS files don’t need any special tool or software. Even a simple text editor like MS Notepad can be used to create a CSS file. However similar to HTML I prefer using Notepad++ as it makes it much easier to read and understand. Use it and you’ll know what I mean. So to make a CSS file all you need to do is type in your CSS code into a text document and save it with a ” .CSS ” file extension (Replace .txt with .css in the filename). That’s pretty much it.
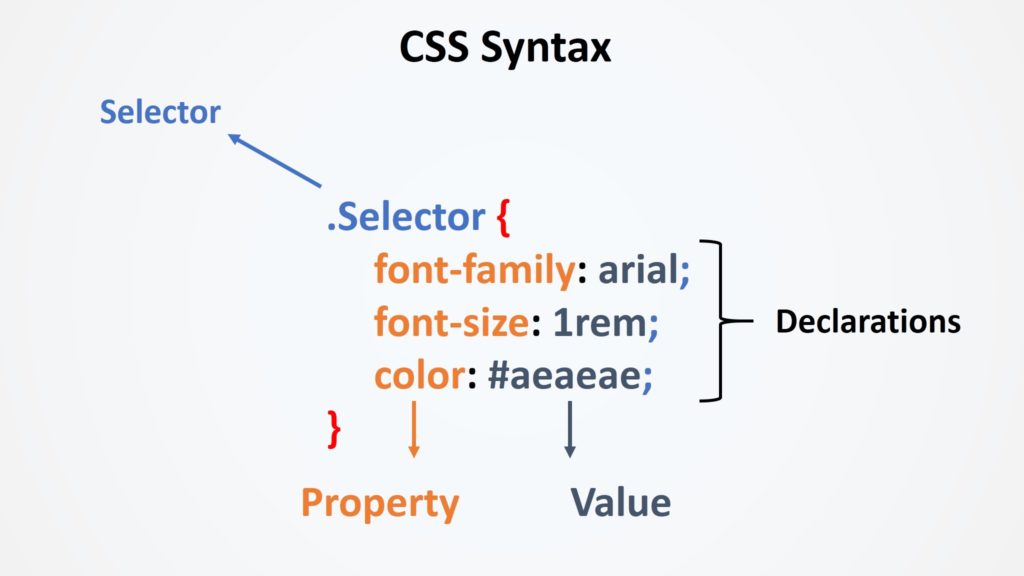
CSS Syntax
CSS Selectors
CSS Selectors basically link a “chunk” of CSS code to a specific HTML Element. Let’s take the HTML file we created earlier as an example. It had a Header, image and a couple of paragraphs. Our CSS File would have styling for all three of them. However it will be the selectors that would inform as to which part of our CSS file relates to the header, the image etc.
How exactly do CSS Selectors work
Firstly there are three main types of CSS Selectors (there’s actually a bunch more, but you’ll mostly see these three in active use.
- Element : This selector is used to select all occurrences of a certain element. For example all <p>’s in the document, or all <img> in the page. These selectors are useful when you want a common style to be followed for all elements of the same type. Like all links should be blue and underlined, all images should have a black border, all paragraphs should have a certain font or all headings should have a certain font size etc.Using the Element Selector
Using the element selector is probably the most straight forward of all. Here’s a few examples.Select all <p> in a document
123p {/*properties come here*/}As you can see I have just used a “p” as the selector.
Select all <img>
12345img {height:14rem;margin-left:0.5rem;margin-right:0.5rem;}Similarly to affect all <img> elements the selector is just “img”.
As you can see, for all elements you would simply use the HTML tag without the angular brackets (<a> would be “a”, <h1> would be “h1” etc)
- CSS Class Selector : We’ve seen a way of affecting all elements of a certain kind, but what if we wanted to select only a specific bunch of elements. Like only the headings in a certain area of the webpage, or links only in the navigation part of a document. In such cases you would use the CSS class Selector. CSS Class Selector basically let’s you give a common name to a bunch of elements so you can address them collectively in your CSS file. This selector needs you to add an attribute named class to the concerned element. Let’s look at this with an example. Say, you have the below HTML Elements
1234567891011<p>Sample Paragraph 1</p><p>Sample Paragraph 2</p><p>Sample Paragraph 3</p>
Styling all <p>s would be straightforward as we’ve seen earlier, but what if you wanted to style only the first and the third paragraph. In such a cases you can use the class selector.
Adding the class attribute
For each element that you want to style you would have to add a class attribute. Something like this
1234567891011<p class="importantSection">Sample Paragraph 1</p><p>Sample Paragraph 2</p><p class="importantSection">Sample Paragraph 3</p>As you can see, I have added a class attribute to the first and third paragraph. You’ll also notice the “importantSection” value given in both paragraphs. This is basically the classname – a name given to the element. A classname can be anything you wish to use. However choosing something descriptive would be helpful. Also, you can only use underscores, hyphens, numbers and alphabets in classnames. Now that we’ve given the concerned elements a classname in HTML it’s time to reference them in our CSS code.
Here’s an example of CSS Code using the class selector
12345.importantSection {font-size:1rem;text-align:center;margin-bottom:0.5rem;}As you can see I’ve simply used the classname with a dot in front as a selector. All selectors starting with a ” . ” or dot are class selectors. Basically adding a dot in front of a selector is a way of telling css that this selector is a class selector and hence it should look for elements with this classname.
- ID Selector : The ID selector is very similar to the class selector. The only difference between classes and IDs is that many elements can have the same class, while in the case of IDs only one single element can have a unique ID. So if there are two <p>s in a document, only one of them can have a certain ID.
Likewise one element can have multiple classes, however with IDs a single element can have only one ID. Just like classes, IDs also need us to add an attribute to the concerned element in HTML. This time however it would be an ID attribute. Similar to the previous example, an ID attribute would be something like this.1234567891011<p ID="importantSection">Sample Paragraph 1</p><p ID="UnimportantSection">Sample Paragraph 2</p><p ID="importantSection">Sample Paragraph 3</p>As you can see, I have added the ID attribute to all three elements. However, they all have different values. This is because one ID can be given only to one element. Other elements however can have other unique IDs set for them (like the second <p> that has “UnimportantSection”)
Similar to classes, the CSS code for an ID selector would be something like this
1234567891011#importantSection {font-size:1rem;text-align:center;margin-bottom:0.5rem;}#UnimportantSection {font-size:0.5rem;text-align:center;margin-bottom:0.5rem;}While classes needed a ” .” before the name, IDs need a ” # ” in front of their name.
There are many more types of selectors, but I won’t get into details of all of them at this moment. However for a quick glance here’s a list of CSS Selectors.
CSS Declarations
CSS Declarations are basically statements that define the style of an elements. It’s like saying “the font size should be 30px, font color should be blue, margin from the top should be 1 px”. Declarations are basically a group of such statements. There is however some structure to be followed.
- All declarations are placed inside curly brackets – “{ }”. This is CSS’s way of knowing what part of the code is to be considered as declarations.
- Statements are separated from each other using a semi-colon. ” ; “. It basically informs CSS as to when a statement has ended
- Each statement is made up of a property component and a value component. Remember the “Font size should be 30px” example?. Here the property is font size and the value is 30px. This will however be written in the following way
|
1 |
font-size : 30px |
There is a huge list of properties used in CSS, while it’s not humanly possible to memorize each and every one of them, it’s good to familiarize with atleast the most frequently used ones. You can use this list as a starting point. Again, you don’t need to remember every property.
This is pretty much it with CSS concepts. I hope you found it as easy as I intended to make it. Feel free to drop your questions in the comment section below.